Showing posts with label Powershell-Tips. Show all posts

Wednesday, May 27, 2015

#73 : How to list all files in current directory and subdirectories using Powershell?

Sometimes, we need to work with numerous files located in certain location. We might need to perform some action or read some lines with those files. When the requirement is all about reading all files in directory and sub-directories, we can simply use ls in Powershell. (Run Get-Alias ls to know which cmdlet is called in background, skipping this so that you learn something more, those who know this can avoid it ;))

Every experiment starts with a small building block, so let's run ls with recursion :

ls -recurse


You see multiple directories, but this is not useful as you don't have much option to perform any task on them.

    Directory: B:\tst

Mode                LastWriteTime     Length Name
----                -------------     ------ ----
d----         5/26/2015   6:08 AM            A
d----         5/26/2015   6:09 AM            B
-a---         5/26/2015   6:09 AM          0 file4.txt
-a---         5/26/2015   6:09 AM          0 file5.txt

    Directory: B:\tst\A

Mode                LastWriteTime     Length Name
----                -------------     ------ ----
-a---         5/26/2015   6:08 AM          0 file1.txt

    Directory: B:\tst\B

Mode                LastWriteTime     Length Name
----                -------------     ------ ----
-a---         5/26/2015   6:09 AM          0 file2.txt
-a---         5/26/2015   6:09 AM          0 file3.txt


Now, run the same command with little twist and then you will be able to much from output :

ls -Recurse | foreach { $_.FullName  }

The result is full list of files and you can perform more precise operations on them.
B:\tst\A
B:\tst\B
B:\tst\file4.txt
B:\tst\file5.txt
B:\tst\A\file1.txt
B:\tst\B\file2.txt
B:\tst\B\file3.txt

But, if you see the output above, you can see that directories are also there,  but your requirement might be only related with files or directories. So, let's get separate results for them.

List all Files recursively :
ls -Recurse | where { $_.PSIsContainer -eq $false } |  foreach { $_.FullName }

Output:
B:\tst\file4.txt
B:\tst\file5.txt
B:\tst\A\file1.txt
B:\tst\B\file2.txt
B:\tst\B\file3.txt

List all directories recursively :
ls -Recurse | where { $_.PSIsContainer -eq $true } |  foreach { $_.FullName }

Output:
B:\tst\A
B:\tst\B

So, this concludes today's tip. Always start with small example and keep trying till you get the results. Send your mails and comments and let me know if you have questions.

Enjoy!


Wednesday, May 13, 2015

#71 : Pause a Powershell Script

Sometimes, we need to pause scripting where any asynchronous operation is in progress or we have to wait for some file to appear. In all such cases, Start-Sleep can help you achieve that. Let's take a look into syntax and then we will use the same in our example :

Syntax:
Start-Sleep -Milliseconds <int> [<CommonParameters>]
Start-Sleep [-Seconds] <int> [<CommonParameters>]


Example:
Pause the script for 5 seconds:
Start-Sleep -Seconds 5


Sunday, May 10, 2015

#69 : Formatted output from a number with decimal using Powershell

Sometimes, we need to produce formatted output from a number with decimals. If the output has to be in a designated formatted such as till two places after decimals, we can simply format them using below. It helps specifying the precision correctly :

Below is the function to help you in setting precision till whatever places of decimal you want. If number is limited to only two digits after decimal, it will add zero as suffix, so this might help in some other cases also where you want to show result in money.

Please check the Gist below :


There are several other ways to do it, but I found it more flexible.
Enjoy scripting !!

Friday, May 8, 2015

#67 : Get Windows Operating System Name and Version

Sometimes, we need to know the Operating system name and version for troubleshooting and sometimes we need to run specific code for specific version. With Powershell, this is very simple.

$OS_VERSION=$(Get-WmiObject -Class Win32_OperatingSystem).Version
$OS_NAME=$(Get-WmiObject -class Win32_OperatingSystem).Caption

echo "Version : $OS_VERSION"
echo "Version : $OS_NAME"


Hope, this was simple and useful for your scripts.
Enjoy scripting!!

Thursday, May 7, 2015

#66 : Formatted Date and Time Output

Mostly, in course of scripting, we need to display date and time in a qualified format. The format depends on the requirement suggested. Such as, your script log will have timestamp in a format like LOG_201505150732.log, but inside log, you timestamp might be set as 2015-05-15 07:32:03. Based on purpose, we use time in different ways.

Powershell does not require much more effort in playing with format. It is more straight forward than anything in Powershell. Simply, remember the table below to set the format :

SpecifierTypeExample Example Output
ddDay{0:dd}10
dddDay name{0:ddd}Tue
ddddFull day name{0:dddd}Tuesday
f, ff, …Second fractions{0:fff}932
gg, …Era{0:gg}A.D.
hh2 digit hour{0:hh}10
HH2 digit hour, 24hr format{0:HH}22
mmMinute 00-59{0:mm}38
MMMonth 01-12{0:MM}12
MMMMonth abbreviation{0:MMM}Dec
MMMMFull month name{0:MMMM}December
ssSeconds 00-59{0:ss}46
ttAM or PM{0:tt}PM
yyYear, 2 digits{0:yy}02
yyyyYear{0:yyyy}2002
zzTimezone offset, 2 digits{0:zz}-05
zzzFull timezone offset{0:zzz}-05:00
:Separator{0:hh:mm:ss}10:43:20
/Separator{0:dd/MM/yyyy}10/12/2002


Using toString() function, you can do all kinds of formatting you want.

For example, if you have to get the timestamp for a log file, use below :
$FILE_NAME="ABC_$($(get-date).toString("yyyyMMddhhmmss")).log"

If you want to output the time in log file, it must be little more readable. Such as below :
$MSG="$($(get-date).toString("yyyy/MM/dd HH:mm:ss" )) : Program Started"

There are lot many experiments possible with it. This is simple, yet effective way to handle time.
Enjoy scripting!!
 

Tuesday, April 21, 2015

#56 : Compression with Powershell or Creating zip file with Powershell

File compression is not at all straight forward in Powershell. Using Windows compression is error-prone. It gives unexpected results and fails silently. The problem is basically with file size larger than 3 Gigs. If file-size is larger than 3 Gigs, Windows 2003 based server will not complete the task and fail silently. If you have delivered it for any critical task, you will find yourself in a real trouble.

Windows native compression method:

Below is the code which can be used : 

#------------------------------------------------------------------------------------------
#     Script : compress_file.ps1
#     Author : Som DT.
#    Purpose : Compress file script
#------------------------------------------------------------------------------------------

function compress-file ([string]$file, [string]$zipfilename)
{
 echo "Compressing [$file] to [$zipfilename]."
 
 if(-not (test-path($zipfilename)))
 {
  set-content $zipfilename ("PK" + [char]5 + [char]6 + ("$([char]0)" * 18))
  (dir $zipfilename).IsReadOnly = $false
  
  $shellApplication = new-object -com shell.application
  $zipPackage = $shellApplication.NameSpace($zipfilename)
  
  $zipPackage.CopyHere($file)
 
  #--Add some delay to wait -# 
  do {
   $zipCount = $zipPackage.Items().count
   echo "Waiting for compression to complete ..."
   Start-sleep -Seconds 1
  }
  while ($zippackage.Items().count -lt 1)
 
  echo "Finished zipping successfully"
 
 }
} 

#------------------------------------------------------------------------------------------

#--Starting comressing the file --# 
compress-file "D:\new.txt" "D:\new.zip"

#------------------------------------------------------------------------------------------


This works fine with Windows 2008 and above operating system. But still there are two problems -

1. CopyHere function is a real mess. It does not stick to the point where this function is called. It moves ahead, so you need to put a logic to make the script wait till compression is over.
2. This is hard to predict if compression failed. Script might run infinite in some cases. This is genuine problem and above script is not recommended.

Monday, April 20, 2015

#55 : Process Handling with Powershell

You can get list of running Processes with command like Get-Process. 

Below command be used to get Names of all processes running - 


CODE: 
 

Stop a Process if the process is running :

I am not sure why somebody would need this. But anyways, just for learning - you can use below -
Below statement would stop each occurence of Notepad running.
CODE:
 

Find the Process which is using maximum CPU :

Yeah, this might be a good example.
CODE:
 

Find the Process which is using minumum CPU :

Below code is just one word different from above. Select-Object -First 1.
CODE:
Find the Process with more than one Occurences : 
CODE:

Wednesday, February 18, 2015

#45 : Display top n lines or last n lines of a file

Often we reach to a situation where we need to get top 10 or 100 lines of a file.
These commands are fairly simple in Unix shell programming and most of you must have used Head and Tail commands. Those commands work really fast and accurate.

Keeping these points in mind, I dig something and want to share will all of you.

How to use Head and Tail Commands in Powershell?

To get the top 10 lines -
Get-Content ".\file_test.txt" | select -First 10

To get the top 10 lines -

Get-Content ".\file_test.txt" | select -Last 10

Easy! This is power of Powershell !

Some more Examples:

Problem: Write a command to get 3rd line of a file.

Solution:
Get-Content ".\file_test.txt" | select -First 3 | select -Last 1

Problem: Write a command to skip 10 lines from top and display rest all lines of file.

Solution:
Get-Content ".\file_test.txt" | select -Skip 10

But this approach has one drawback, when file is so big, it takes a little more time to produce results.

To be able to read a big file, you can adjust Get-Content to read only few lines. As you saw, we were reading the complete file before that caused more memory consumption.


Enjoy Scripting!!

Thursday, February 12, 2015

#44 : Display Inputbox with Powershell

Hi All,

Powershell does not support InputBox itself. We might have to do some effort to achieve it. I did some research and found two methods can be used :

Below is the complete demonstration:


DEPLOYMENT STEPS

This method is extremely flexible and requires little more effort. If you COPY+PASTE, there is not much effort, but while developing I did some more effort.

Let's have look into the code.

I have created a function CustomInputBox which will create all the GUI interface and will return the user input.


function CustomInputBox([string] $title, [string] $message, [string] $defaultText) 
 {
    [void] [System.Reflection.Assembly]::LoadWithPartialName("System.Drawing")
    [void] [System.Reflection.Assembly]::LoadWithPartialName("System.Windows.Forms") 

    $userForm = New-Object System.Windows.Forms.Form
    $userForm.Text = "$title"
    $userForm.Size = New-Object System.Drawing.Size(290,150)
    $userForm.StartPosition = "CenterScreen"
        $userForm.AutoSize = $False
        $userForm.MinimizeBox = $False
        $userForm.MaximizeBox = $False
        $userForm.SizeGripStyle= "Hide"
        $userForm.WindowState = "Normal"
        $userForm.FormBorderStyle="Fixed3D"
     
    $OKButton = New-Object System.Windows.Forms.Button
    $OKButton.Location = New-Object System.Drawing.Size(115,80)
    $OKButton.Size = New-Object System.Drawing.Size(75,23)
    $OKButton.Text = "OK"
    $OKButton.Add_Click({$value=$objTextBox.Text;$userForm.Close()})
    $userForm.Controls.Add($OKButton)

    $CancelButton = New-Object System.Windows.Forms.Button
    $CancelButton.Location = New-Object System.Drawing.Size(195,80)
    $CancelButton.Size = New-Object System.Drawing.Size(75,23)
    $CancelButton.Text = "Cancel"
    $CancelButton.Add_Click({$userForm.Close()})
    $userForm.Controls.Add($CancelButton)

    $userLabel = New-Object System.Windows.Forms.Label
    $userLabel.Location = New-Object System.Drawing.Size(10,20)
    $userLabel.Size = New-Object System.Drawing.Size(280,20)
    $userLabel.Text = "$message"
    $userForm.Controls.Add($userLabel) 

    $objTextBox = New-Object System.Windows.Forms.TextBox
    $objTextBox.Location = New-Object System.Drawing.Size(10,40)
    $objTextBox.Size = New-Object System.Drawing.Size(260,20)
    $objTextBox.Text="$defaultText"
    $userForm.Controls.Add($objTextBox) 

    $userForm.Topmost = $True
    $userForm.Opacity = 0.91
        $userForm.ShowIcon = $False

    $userForm.Add_Shown({$userForm.Activate()})
    [void] $userForm.ShowDialog()

    $value=$objTextBox.Text 

    return $value

 }


$userInput = CustomInputBox "User Name" "Please enter your name." ""
 if ( $userInput -ne $null ) 
 {
  echo "Input was [$userInput]"
 }
 else
 {
  echo "User cancelled the form!"
}


CONCLUSION

You may try any of the merthod described above. I would suggest Method#2 is more flexible and you have much more scope to improve. But again, if users are used to have the same inputbox which was famous in previous years, Method#1 is for you.
Happy scripting !

Wednesday, January 28, 2015

#42 : How to change modified date of file using Powershell?

I always had a technique in Unix which converts modified date of a file. But never tried the same in Windows. But it was again possible in Windows using MKS Toolkit or Cygwin. There are very rare situation where you need to modified date of file. I don't want to go depth of reason, let's see
how we can do it.

DESCRIPTION

Run the below command:
ls

Directory: C:\Users\admin\Downloads


Mode LastWriteTime Length Name
---- ------------- ------ ----
-a--- 9/22/2012 9:37 PM 4750740 Setup_BullzipPDFPrinter_9_0_0_1437.zip
-a--- 9/23/2012 10:10 PM 58158 webcam-toy-photo1.jpg
-a--- 9/23/2012 10:10 PM 58158 webcam-toy-photo2.jpg


Ok, you may notice the LastWriteTime column. This column can be simply used to change the date and time.

Let's rename webcam-toy-photo2.jpg with modified date as 9/23/1942 10:10 PM.

Run the below command:

ls | where { $_.Name -eq "webcam-toy-photo2.jpg" } | foreach { $_.LastWriteTime="9/23/1942 10:10 PM" }

Let's check the date again. The date is of 1942.

ls

Directory: C:\Users\admin\Downloads


Mode LastWriteTime Length Name
---- ------------- ------ ----
-a--- 9/22/2012 9:37 PM 4750740 Setup_BullzipPDFPrinter_9_0_0_1437.zip
-a--- 9/23/2012 10:10 PM 58158 webcam-toy-photo1.jpg
-a--- 9/23/1942 10:10 PM 58158 webcam-toy-photo2.jpg


Enjoy Scripting!!

Wednesday, January 14, 2015

#40 : Reading, Updating and Inserting Data into Excel with Powershell

We often find ourself into a situation when we have to create or write into Excel sheet. This tasks can be done with two ways -
1. Using Excel COM object
2. Using Jet Engine

Using COM object is fairly simple and anyone can copy and paste from a list of sources. The drawback of using Excel COM object is that you need to have Excel application installed on the machine. But this condition is not applicable to production servers where mostly Excel and other Microsoft office tools are not installed due to security threats. Basically you will find them installed on your workstations. Considering these points I was looking for a good method to connect to Excel and update some records in Excel sheet.

Without wasting your time and mine too, let's look into code which can do it for you. I know, if you are good programmer, you don't have to break your head much. If you are a beginner, this blog is not that suitable (I must say). I am busy person and I don't have this only job (Sorry).

1. Sample Code to read data from Excel sheet -

Testing Preparations:
1. Create an Excel document. (If you don't have Microsoft Office in your workstation, you may ask your IT dept. to install OpenOffice or LiberOffice).
2. On first row of sheet as Name and insert some records-
Name
Som
Manu
Ravi
Akash

3. Save and close the doc. I assume, you saved it as F:\test.xls.

Code to Read data from Excel Sheet-

$strFileName ="F:\test.xls"
$strSheetName = 'Sheet1$'
$strProvider = "Provider=Microsoft.Jet.OLEDB.4.0"
$strDataSource = "Data Source = $strFileName"
$strExtend = "Extended Properties=Excel 8.0"
$strQuery = "Select * from [$strSheetName]"

$strQuery = "Select * from [$strSheetName]"
$objConn = New-Object System.Data.OleDb.OleDbConnection("$strProvider;$strDataSource;$strExtend")
$sqlCommand = New-Object System.Data.OleDb.OleDbCommand($strQuery)
$sqlCommand.Connection = $objConn
$objConn.open()
$DataReader = $sqlCommand.ExecuteReader()

While($DataReader.read())
{
$ComputerName = $DataReader[0].Tostring() 
echo $ComputerName 
}  
$dataReader.close()
$objConn.close()

Code to Update data in Excel Sheet-
(Below code will update all names with Som)

$strFileName ="F:\test.xls"
$strSheetName = 'Sheet1$'
$strProvider = "Provider=Microsoft.Jet.OLEDB.4.0"
$strDataSource = "Data Source = $strFileName"
$strExtend = "Extended Properties=Excel 8.0"

$strQuery = "Update [$strSheetName] set Name = 'Som' "
$objConn = New-Object System.Data.OleDb.OleDbConnection("$strProvider;$strDataSource;$strExtend")
$sqlCommand = New-Object System.Data.OleDb.OleDbCommand($strQuery)
$sqlCommand.Connection = $objConn
$objConn.open()
$sqlCommand.ExecuteNonQuery()
$objConn.Close()

Code to Insert data in Excel Sheet-
(Below code will insert one more row)

$strFileName ="F:\test.xls"
$strSheetName = 'Sheet1$'
$strProvider = "Provider=Microsoft.Jet.OLEDB.4.0"
$strDataSource = "Data Source = $strFileName"
$strExtend = "Extended Properties=Excel 8.0"

$strQuery = "Insert into [$strSheetName] values ('Ravi')"
$objConn = New-Object System.Data.OleDb.OleDbConnection("$strProvider;$strDataSource;$strExtend")

$sqlCommand = New-Object System.Data.OleDb.OleDbCommand($strQuery)

$sqlCommand.Connection = $objConn
$objConn.open()

$sqlCommand.ExecuteNonQuery()
$objConn.Close()

Hope, this will help you.

Enjoy scripting!!

Wednesday, January 7, 2015

#39 : How to write in Windows Event Log with Powershell?

Happy new year!

It has been long since I wrote something in this blog. Basically I got
busy with ASP.NET Programming and I am paying more attention to ASP.NET
these days. Ok, let's start with this.


GENERAL DESCRIPTION

Writing into Windows Event log requires two steps:

1. Creating a log entry about the application. This is mandatory to have
an entry for your application or script in Eventlog. The below statement
will fail if the source name already exists.

New-EventLog -LogName Application -Source "YourScriptName"


2. Writing into EventLog
It can be done with the below stateement:

Write-EventLog -logname Application -source "YourScriptName" -eventID 3001
-entrytype Information -message "The message you want" -category 1
-rawdata 10,20

IMPLEMENTATION

I would suggest it can be implemented with below concept:
I will create a single function in my script which will log from several
locations. So, this will be easier for you to use the same function
everywhere.


$SCRIPT_NAME="MyScriptName"

function log_this([string]$MESSAGE)
{

if ( !([System.Diagnostics.EventLog]::SourceExists($SCRIPT_NAME)) )
{
New-EventLog -LogName Application -Source $SCRIPT_NAME
}

Write-EventLog -logname Application -source $SCRIPT_NAME -eventID 3001
-entrytype Information -message $MESSAGE -category 1 -rawdata 10,20

}

log_this "Failed to peform something"


CMDLETS USED

Write-EventLog
New-EventLog


CONCLUSION

As you saw above, I have used [System.Diagnostics.EventLog]::SourceExists
method for find the existence of your application. This method is really
useful because, if you do not know whether your application/script source
name is entered or not, it will throw error.


with regards,
Som Dutt Tripathi

Thursday, December 25, 2014

#37 : Download Files from Internet with Powershell

Powershell can be used to download a file from internet. This might help you matching some item from internet or you can create a download manager kind of software in Powershell.
Actually, you can do nearly everything which you can do in C# or any .NET based programming language because, .NET framework is common to C#, VB.NET and Powershell as well. Both Powershell or C# compile the code into MSIL (Microsoft Intermediate Language). But the only difference is Powershell is in form of script and C# will be a program. 
Powershell scripts can be compiled using C#, but again the compiled executable will require Powershell be installed on the machine. This cannot be called as standalone executable, but again I think "Can you run a C# code when .NET framework is not installed?". Anyways, lets not waste more time in thinking, below is the piece of code- 

(new-object System.Net.WebClient).Downloadfile("http://www.freeware995.com/bin/pdfedit.exe", "d:\pdfedit.exe")

Above is smallest inner line of a possible big code which will handle download of files from Internet. 

For sake of simplicity, I always prefer to give a one-liner. The reason is, when you want to know how to do something, your intention is basically to get something too small which can be further enhanced in your program. When I search, I look for a small code and I hope everyone does. There is no point is providing a complex code which you could not understand or incorporate in your code!

Enjoy scripting!!

Thursday, October 9, 2014

#28 : Display Messagebox with Powershell

Sometimes we need to display a messagebox to user. Especially when user interaction is required and we want to warn user or inform that a process has completed or so. Powershell leverages all .NET features available to any .NET language such as C# or VB.NET. This gives a lot of freedom to developers and there are not console world and GUI world when you are programming with Powershell. Let's take a look how we can do it.

Below video is the complete demonstation:


Generating a Messagebox -

1. Load the Assembly

[System.Reflection.Assembly]::LoadWithPartialName("System.Windows.Forms")

Output-

GAC Version Location
--- ------- --------
True v2.0.50727 C:\Windows\assembly\GAC_MSIL\System.Windows.Forms\2.0.0.0__b77a5c561934e089\System.Windows.Forms.dll

Note: If you don't want the output, you can simple redirect to Out-nul. This will skip displaying assembly loading statement.
You can also cast is with [void] such as below:
[void][System.Reflection.Assembly]::LoadWithPartialName("System.Windows.Forms")


2. Display a simple Messagebox
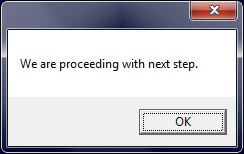
[System.Windows.Forms.MessageBox]::Show("We are proceeding with next step.")

Now, the messagebox appears something like this -


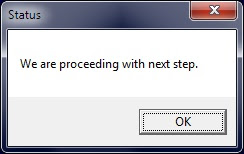
If you see above message, you will find Title is missing. Let's add a title also by adding below piece of code -
[System.Windows.Forms.MessageBox]::Show("We are proceeding with next step." , "Status")


So, this was all about showing message with title. This was just OK message so, there is nothing to decide for user except pressing OK button.
Types of Messageboxes :
We have 6 types of Messageboxes in Powershell -

0: OK
1: OK Cancel
2: Abort Retry Ignore
3: Yes No Cancel
4: Yes No
5: Retry Cancel

Note: The number mentioned in left is the third parameter of Messagebox.

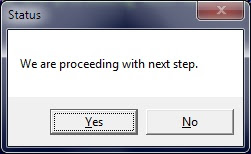
If you want to show Yes No, just add 4 as third parameter -

[System.Windows.Forms.MessageBox]::Show("We are proceeding with next step." , "Status" , 4)
Now, this will display a Messagebox like this -


How to get values from Messagebox?
As you know, when you press any button, you need to get the result and work upon the decision -
$OUTPUT= [System.Windows.Forms.MessageBox]::Show("We are proceeding with next step." , "Status" , 4)
if ($OUTPUT -eq "YES" )
{
..do something

}
else
{
..do something else
}

The value of button pressed is stored in $OUTPUT variable. This variable can then be used for your programming logic.

I have given just a primer how to use Messagebox class. But, if you want to go indepth of System.Windows.Forms.MessageBox class, you may look for the link below -

http://msdn.microsoft.com/en-us/library/system.windows.forms.messageboxbuttons.aspx


Wednesday, September 10, 2014

#26 : How to send SMTP Mail with Powershell ?

Many of your scripts require to send mail. There are several ways to send mail, but I am introducing you with SMTP mail sending script here. The code will accept below values which either you can hard-code inside the script or you can make a config file or ini file to get the settings. Below is simple piece of code for the same:


How to send mail to multiple recipients?

This can be done by modifying NOTIFY_ID variable with below -

$NOTIFY_ID=som@foo.com,john@foo.com


Make sure you are using a comma(,) to separate two Mail-Ids.

How to Send HTML Formatted mail using Powershell ?

This is another good option which can be done easily with Powershell. You need to just add one more line inside the code:


Easy and Simple. Enjoy Scripting!!

Thursday, September 4, 2014

#25 : Create a ShortCut with Powershell

Creating a Shortcut might be a difficult task in any scripting language in Windows. Not sure how difficult or simple is there in Unix.

Let's take a look on the simple few lines which accomplish this task -

clear
$wsc = New-Object -ComObject ("Wscript.Shell")$sc=Join-Path -Path "d:\test" -childpath "Notepad.lnk"
$slink=$wsc.CreateShortcut($sc)$slink.TargetPath = "C:\windows\notepad.exe"
$slink.WindowStyle = 0
$slink.Hotkey = "CTRL+SHIFT+F"
$slink.IconLocation = "notepad.exe, 0"
$slink.WorkingDirectory = "d:\Test"
$slink.Save() 


Since this uses Wscript.Shell which is VBScript shell, there are some Windows version where you do not see desired output. Please let me know..

Enjoy!

Tuesday, July 22, 2014

#19 : Find files more than Modified date of a File

Sometime, we come to a situation where we have to purge some files. The File-Purge has one more trick that it must be greater than LastWriteDate of a file.

Below code might help -

ls | where {$_.LastWriteTime -ge (ls | where { $_.name -eq "somd.flg" } ).LastWriteTime }

Monday, June 16, 2014

#16 : How to play beep and other system sounds?

Below piece of code can be used to play a beep from a Powershell script. I have used in many of scripts where user interaction is required. Presenting a list of different sounds which can be played from a Powershell script.

Beep:
  1. #--Statement to play beep from Powershell Scripts --#    
  2. clear   
  3. [System.Media.SystemSounds]::Beep.Play()   
Hand:
  1. #--Statement to play hand from Powershell Scripts --#    
  2. clear   
  3. [System.Media.SystemSounds]::Hand.Play()   
Asterisk:
  1. #--Statement to play Asterisk from Powershell Scripts --#    
  2. clear   
  3. [System.Media.SystemSounds]::Asterisk.Play()   
    Exclamation:
    1. #--Statement to play Exclamation from Powershell Scripts --#    
    2. clear   
    3. [System.Media.SystemSounds]::Exclamation.Play()   
    Please test and let me know your response. Thanks.

    Monday, June 9, 2014

    #15 : Handling Clipboard with Powershell

    Not sure when you might need to get data from Clipboard. But I thought it might be useful in some cases which I might not think about.
    So, below is the piece of code which can be used.

    Getting Data from Clipboard:

    Below code will look if the Clipboard contains a text data and if this is so, it would display. You may store it into variable and do whatever you like.

    #--Statement to Get Text Data from Clipboard --#   
    if ( [System.Windows.Forms.Clipboard]::GetText() -ne ""  )    
    {    
        [System.Windows.Forms.Clipboard]::GetText()   
       
    else   
    {   
        Write-Output "Clpboard does not contain Text data"    
    }    


    Setting Data into Clipboard:

    Use below piece of code to set a value to the Clipboard. To confirm if value is set or not, please use above section.

    #--Statement to Set item into Clipboard --#   
    $Data_to_Set="Som DT"    
    if ($Data_to_Set -ne "" )    
    {    
        [System.Windows.Forms.Clipboard]::SetText($Data_to_Set)   
    }   


    Clearing Data from Clipboard:

    Below code can be used to clear data available in clipboard.

    #--Statement to clear the data from clipboard --#    
    [System.Windows.Forms.Clipboard]::Clear()   


    I hope this will help you. Please comment here if you have any thoughts about it.

    Friday, June 6, 2014

    #14 : Find all the files modified within last 7 days

    Such requirements come to picture many times in different forms. Below is piece of code which can be used for such requirements. I have made it recursive to all subdirectories also.

    1. clear   
    2.   
    3. #--Change the name with directory you want to visit --#    
    4. $dir_to_look="C:\Users\admin\Desktop"    
    5.   
    6. #--You may change the number of days of your choice --#   
    7. $seven_days_backdate=$(Get-Date).AddDays(-7)    
    8.   
    9. #--Find the files which are modified or created within last 7 days --#    
    10. Get-Childitem $dir_to_look -Recurse | `   
    11.         where-object {!($_.psiscontainer)} | `   
    12.         where { $_.LastWriteTime -gt $seven_days_backdate } | `   
    13.         foreach {  Write-Host "$($_.LastWriteTime) :: $($_.Fullname) "  }   

    #112: How to handle xml document in Powershell?

     In PowerShell, you can handle XML data using various cmdlets and methods provided by the .NET Framework. Here's a basic guide on how to...